
Docker 교육 3일차 정리
Docker network
Docker container load balancer
- 사용자 정의 브릿지 네트워크와 docker run 수행시 --net-alias 옵션으로 묶인 모든 컨테이너
에는 기본적으로 서비스를 검색할 수 있는 내장 DNS서버가 구현 - 이때, docker container들은 그 network 내에서 cluster를 이루고, 하나의 네트워크 망 구성
- haproxy, nginx, apache load balancer등 외부 도구에 의존한 로드 밸런싱도 가능
사용자정의 네트워크 구성
## netlb라는 이름을 가진 브릿지 네트워크 구성
jeff@hostos1:~$ docker network create \
> --driver bridge \
> --subnet 172.200.1.0/24 \
> --ip-range 172.200.1.0/24 \
> --gateway 172.200.1.1 \
> netlb
5b91984485d398986dfab439c054aa433789cd91ac1094fbbb0bdf923dc3af3b

jeff@hostos1:~$ docker network ls
NETWORK ID     NAME         DRIVER    SCOPE
5b91984485d3   netlb        bridge    local
netlb 네트워크 브릿지를 사용하는 클러스터 컨테이너 생성
jeff@hostos1:~$ docker run -itd --name=nettest1 --net=netlb \
> --net-alias inner-net ubuntu:14.04
0037bf6e1608544e58fbea2c1e4597b051e59dcf9bf291ddf4f1544e3ecb33f9
jeff@hostos1:~$ docker run -itd --name=nettest2 --net=netlb --net-alias inner-net ubuntu:14.04
bb68b4a659b6039cb49252dd6b4446cc8d22ec3c62efd0c11e27a00b43ca8f28
jeff@hostos1:~$ docker run -itd --name=nettest3 --net=netlb --net-alias inner-net ubuntu:14.04
70fb9f970cff2e11cf0981b7d5c128ae4c9100f84fe70716828b7e449d194b2d
jeff@hostos1:~$ docker inspect nettest1 |grep -i ipa
            "SecondaryIPAddresses": null,
            "IPAddress": "",
                    "IPAMConfig": null,
                    "IPAddress": "172.200.1.2",
jeff@hostos1:~$ docker inspect nettest2 |grep -i ipa
            "SecondaryIPAddresses": null,
            "IPAddress": "",
                    "IPAMConfig": null,
                    "IPAddress": "172.200.1.3",
jeff@hostos1:~$ docker inspect nettest3 |grep -i ipa
            "SecondaryIPAddresses": null,
            "IPAddress": "",
                    "IPAMConfig": null,
                    "IPAddress": "172.200.1.4",
- net alias를 통해 inner-net이라는 명칭의 클러스터그룹 생성
- 컨테이너 nettest1, 2, 3을 생성해준다
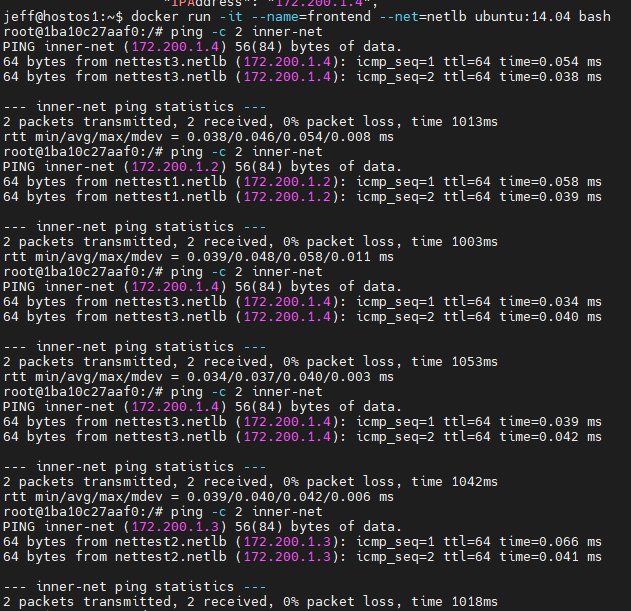
- frontend 컨테이너를 생성 후,
- inner-net그룹의 클러스터로 ping,
- 그룹내 랜덤한 host로 ping
- loadbalancing
- apt-get install dns-utils
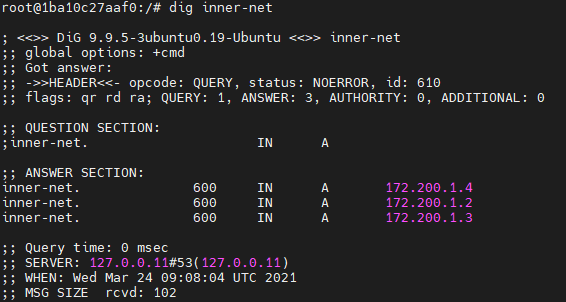
- dig inner-net
- inner-net그룹에 container 확인
추가 컨테이너 생성
jeff@hostos1:~$ docker run -itd --name=nettest4 --net=netlb --net-alias inner-net ubuntu:14.04
7ba71a59102b6663c5f141b31bbb388b75feff325439fafcc565b9cecfd262cb
자동 등록
;; ANSWER SECTION:
inner-net.              600     IN      A       172.200.1.2
inner-net.              600     IN      A       172.200.1.4
inner-net.              600     IN      A       172.200.1.3
inner-net.              600
추가 컨테이너를 생성하여도 자동으로 등록되어 있다.
NGINX LB(LoadBalancing)
jjeff@hostos1:~$ sudo nginx -v
nginx version: nginx/1.14.0 (Ubuntu)

jeff@hostos1:~$ sudo systemctl status nginx.service
● nginx.service - A high performance web server and a reverse proxy server
   Loaded: loaded (/lib/systemd/system/nginx.service; enabled; vendor preset: enabled)
   Active: active (running) since Thu 2021-03-25 09:41:42 KST; 1min 9s ago
     Docs: man:nginx(8)
  Process: 25957 ExecStart=/usr/sbin/nginx -g daemon on; master_process on; (code=exited, status=0/SUCCESS)
  Process: 25942 ExecStartPre=/usr/sbin/nginx -t -q -g daemon on; master_process on; (code=exited, status=0/SUCCESS)
 Main PID: 25959 (nginx)
    Tasks: 5 (limit: 4915)
   CGroup: /system.slice/nginx.service
           ├─25959 nginx: master process /usr/sbin/nginx -g daemon on; master_process on;
           ├─25960 nginx: worker process
           ├─25961 nginx: worker process
           ├─25962 nginx: worker process
           └─25963 nginx: worker process

 3월 25 09:41:42 hostos1 systemd[1]: Starting A high performance web server and a reverse proxy server...
 3월 25 09:41:42 hostos1 systemd[1]: Started A high performance web server and a reverse

 jeff@hostos1:~$ netstat -nlp |grep 80
(Not all processes could be identified, non-owned process info
 will not be shown, you would have to be root to see it all.)
tcp        0      0 0.0.0.0:80              0.0.0.0:*               LISTEN      -
tcp6 0 0 :::80 :::* LISTEN - - apt-get install nginx
- nginx -v 버전확인
- nginx사용을 위한 80번 포트 사용 확인
jeff@hostos1:~/LABs/docker-phpserver$ docker run -itd -p 5001:80 -h alb-node01 -v `pwd`/log-alb01:/var/log/apache2 --name=alb-node01 php-alb:1.0
6b280e2940b29e7ec64ea9ed87920d9da57198d1ece19028078009cab9322816
jeff@hostos1:~/LABs/docker-phpserver$ docker run -itd -p 5002:80 -h alb-node01 -v `pwd`/log-alb02:/var/log/apache2 --name=alb-node02 php-alb:1.0
5645249c0106f55a3e9a23aaa56392c5f611b1ca96ee0c82d651c1d8f608a5f2
jeff@hostos1:~/LABs/docker-phpserver$ docker run -itd -p 5003:80 -h alb-node01 -v `pwd`/log-alb03:/var/log/apache2 --name=alb-node03 php-alb:1.0
5cb1ed19a57fba0e29a95f6c67b5311339c8cd1d8eba49f81cf98df426833ebc

jeff@hostos1:~/LABs/docker-phpserver$ docker ps
CONTAINER ID   IMAGE                    COMMAND                  CREATED          STATUS          PORTS                    NAMES
5cb1ed19a57f   php-alb:1.0              "docker-php-entrypoi…"   6 seconds ago    Up 4 seconds    0.0.0.0:5003->80/tcp     alb-node03
5645249c0106   php-alb:1.0              "docker-php-entrypoi…"   15 seconds ago   Up 13 seconds   0.0.0.0:5002->80/tcp     alb-node02
6b280e2940b2   php-alb:1.0              "docker-php-entrypoi…"   24 seconds ago   Up 22 seconds   0.0.0.0:5001->80/tcp     alb-node01

jeff@hostos1:~/LABs/docker-phpserver$ sudo netstat -nlp |grep "5001\|5002\|5003"
[sudo] password for jeff:
tcp        0      0 0.0.0.0:5001            0.0.0.0:*               LISTEN      27291/docker-proxy
tcp        0      0 0.0.0.0:5002            0.0.0.0:*               LISTEN      27458/docker-proxy
tcp        0      0 0.0.0.0:5003            0.0.0.0:*               LISTEN      27623/docker-proxy

jeff@hostos1:~/LABs/docker-phpserver$ docker cp index.php3 alb-node01:/var/www/html/index.php
jeff@hostos1:~/LABs/docker-phpserver$ docker cp index.php3 alb-node02:/var/www/html/index.php
jeff@hostos1:~/LABs/docker-phpserver$ docker cp index.php3 alb-node03:/var/www/html/index.php

vim /etc/nginx/nginx.conf               ##weight=가중치
events { worker_connections 1024; }

http {

     # List of application servers
     upstream backend-alb {
        server 127.0.01:5001 weight=6;
        server 127.0.01:5002 weight=2;
        server 127.0.01:5003 weight=2;
     }

     # Configuration for the server
     server {

        # Running port
        listen 80 default_server;

        #Proxing the connections
        location / {
            proxy_pass  http://backend-alb;
        }
     }
}
- node01~03까지 생성을 해준다.
- hostname = alb-node01~03
- port = 5001~5003
- -v 볼륨마운트
위 작성시 alb-node01은 02, 03으로 작성해야 하지만 실수함.
- 5001~5003까지 netstat -nlp를 통해 확인 후,
- 미리 작성되어있는 php파일을 alb-node의 컨테이너로 복사
- nginx.conf를 백업 후 새로작성.
- weight = 가중치로 비율을 옵션으로 설정 가능


localhost ip로 웹브라우저에 접근하여 새로고침을 하였을 때, port번호가 변경된다.
위에 컨테이너 작성시 오타로 인하여 alb-node 이름은 alb-node01로 고정 되어있지만, 포트 번호는 계속하여 변경 된다.

새로고침하면서 iptraf-ng를 통하여 veth의 수치가 변경되는 것을 확인
Docker container 관리
리소스에 대한 런타임 제약(resource limit)
container를 생성하는 run, create에서 container의 자원 할당량 조정옵션 지정 가능
옵션 미 지정 시 container는 host os의 자원을 제한 없이 사용 가능
- 옵션 설정을 통해 다른 container는 host os의 자원을 제한 없이 사용 가능
- 생성 후 변경 시에는 docker update 명령 이용
docker 리소스를 제한하는 기능은 linux의 cgoups 기능 활용
| 옵션 | 설명 |
| -c, -cpu-shares=0(cpu time scheduling) | cpu 리소스 분배(default는 1024, cpu할당에서 1의 비율 의미 |
| -m, --memory=[메모리 사용량], --memory-swap | 메모리 사용량 제한(단위는 b, k, m, g등. default는 1024) |
| --device-write-bps, --device-read-bps, --device-write-iops, --device-read-iops, --blkio |
container memory 제한
jeff@hostos1:~/LABs$ docker run -d --memory=1g --name=nginx_mem_1g nginx
WARNING: Your kernel does not support swap limit capabilities or the cgroup is not mounted. Memory limited without swap.
d2db1d452ab18a2e3352447705979be7e9f5f20138f76d00f02523d3d89cf0ab

jeff@hostos1:~$ sudo vim /etc/default/grub
GRUB_CMDLINE_LINUX_DEFAULT="quiet splash"
change
GRUB_CMDLINE_LINUX_DEFAULT="cgroup_enable=memory swapaccount=1"
jeff@hostos1:~$ docker run -d --memory=1g --name=nginx_mem_1g nginx
428700c59ab392c1173344fc8433921f95bd08ce616dc98e886d633a16a8c46a
jeff@hostos1:~$ docker inspect nginx_mem_1g |grep \"Memory\"
            "Memory": 1073741824,

jeff@hostos1:~$ docker run -m=200m --memory-swap=300m -it -d --name=mem-test ubuntu:14.04
e60342f666d1e5ee329d3ab895dcd5c6faa47c76d6b07090fbb462e08afa0c61
jeff@hostos1:~$ docker inspect mem-test |grep \"Memory\"
            "Memory": 209715200,
jeff@hostos1:~$ docker inspect mem-test |grep \"MemorySwap\"
            "MemorySwap": 314572800,
- 메모리 limit을 설정한 nginx컨테이너
- error발생
- 커널 수정후 완성
- swap limit도 가능
container cpu 제한
host에 cpu가 여러개 있을때 --cpuset-cpus를 지정해 container가 특정 cpu만 사용하도록 지정
host가 보유한 cpu 수에서 몇 번째를 사용하도록 할 것인지 지정
--cpuset-cpus="0,3" -> 1,4번째 cpu 사용 htop
--cpuset-cpus="0-2" -> 1,2,3번째 cpu 사용
jeff@hostos1:~/LABs$ docker run -d --name cpuset_1 --cpuset-cpus=2 leecloudo/stress:1.0 stress --cpu 1
jeff@hostos1:~/LABs$ docker run -d --name cpuset_2 --cpuset-cpus=0,3 leecloudo/stress:1.0 stress --cpu 2
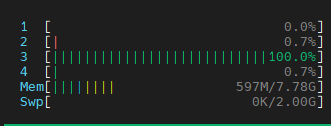
cpu 사용량을 20%로 제한
jeff@hostos1:~/LABs$ docker run -d --name cpuset_1 --cpuset-cpus=2 leecloudo/stress:1.0 stress --cpu 1
jeff@hostos1:~/LABs$ docker update --cpus=0.2 cpuset_1

jeff@hostos1:~/LABs$ docker run -d --name cpuset_2 --cpuset-cpus=0,3 leecloudo/stress:1.0 stress --cpu 2
jeff@hostos1:~/LABs$ docker update --cpus=0.2 cpuset_2


container disk 제한
jeff@hostos1:~/LABs$ docker run -it --rm ubuntu:14.04 bash
root@87731e2390d6:/# dd if=/dev/zero of=test.out bs=1M count=10 oflag=diret
10+0 records in
10+0 records out
10485760 bytes (10 MB) copied, 0.0168815 s, 621 MB/s

jeff@hostos1:~/LABs$ docker run -it --rm --device-write-bps /dev/sda:1mb ubuntu:14.04 bash
root@1e796a5ce8ca:/# dd if=/dev/zero of=test.out bs=1M count=10 oflag=direct
10+0 records in
10+0 records out
10485760 bytes (10 MB) copied, 10.0043 s, 1.0 MB/s

jeff@hostos1:~/LABs$ docker run -it --rm --device-write-bps /dev/sda:10mb ubuntu:14.04 bash
root@27c0f57d1834:/# dd if=/dev/zero of=test.out bs=1M count=10 oflag=direct
10+0 records in
10+0 records out
10485760 bytes (10 MB) copied, 1.02809 s, 10.2 MB/s


jeff@hostos1:~/LABs$ docker run -it --rm --device-write-iops /dev/sda:1mb ubuntu:14.04 bash
root@35826a471190:/# dd if=/dev/zero of=blkio.out bs=1M count=10 oflag=direct
10+0 records in
10+0 records out
10485760 bytes (10 MB) copied, 0.907194 s, 11.6 MB/s

jeff@hostos1:~/LABs$ docker run -it --rm --device-write-iops /dev/sda:1 ubuntu:14.04 bash
root@0d531e0aa6eb:/# dd if=/dev/zero of=blkio.out bs=1M count=10 oflag=direct
10+0 records in
10+0 records out
10485760 bytes (10 MB) copied, 16.3022 s, 643 kB/s
container volume bind
db의 중요 데이터 보호 및 영속성 유지
jeff@hostos1:~$ docker run -it --name=mysql-vtest -e MYSQL_ROOT_PASSWORD=mjeff \
> -e MYSQL_DATABASE=dockertest -v /home/jeff/volume_test:/var/lib/mysql -d mysql:5.7
71b42d84ff4c6bb5f856bfd7702be87b90e9c735b6ca0f2c2e9c74f8b22003e6
jeff@hostos1:~$ docker exec -it mysql-vtest bash
root@71b42d84ff4c:/# mysql -uroot -p
Enter password:
Welcome to the MySQL monitor.  Commands end with ; or \g.
Your MySQL connection id is 2
Server version: 5.7.33 MySQL Community Server (GPL)

Copyright (c) 2000, 2021, Oracle and/or its affiliates.

Oracle is a registered trademark of Oracle Corporation and/or its
affiliates. Other names may be trademarks of their respective
owners.

Type 'help;' or '\h' for help. Type '\c' to clear the current input statement.

mysql> show databases;
+--------------------+
| Database           |
+--------------------+
| information_schema |
| dockertest         |
| mysql              |
| performance_schema |
| sys                |
+--------------------+
5 rows in set (0.00 sec)

mysql> use dockertest;
Database changed
mysql> create table mytab (c1 int, c2 char);
Query OK, 0 rows affected (0.01 sec)

mysql> insert into mytab values (1,'a');
Query OK, 1 row affected (0.00 sec)

mysql> commit;
Query OK, 0 rows affected (0.00 sec)

mysql> exit
Bye
root@71b42d84ff4c:/# exit
exit
jeff@hostos1:~$ cd volume_test/
jeff@hostos1:~/volume_test$ ls
auto.cnf         client-key.pem  ib_logfile0  performance_schema  server-key.pem
ca-key.pem       dockertest      ib_logfile1  private_key.pem     sys
ca.pem           ib_buffer_pool  ibtmp1       public_key.pem
client-cert.pem  ibdata1         mysql        server-cert.pem


jeff@hostos1:~/volume_test$ docker stop mysql-vtest
mysql-vtest
jeff@hostos1:~/volume_test$ docker rm mysql-vtest
mysql-vtest
컨테이너 볼륨을 제거하고 다시 생성 후 마운트하여도 데이터는 살아있다.
container volume quota(할당량) 제한
jeff@hostos1:~$ docker run -it -v `pwd`/myvolume:/webapp ubuntu:14.04 bash
root@e3d24e1572fc:/# df -h
Filesystem      Size  Used Avail Use% Mounted on
overlay          98G   12G   82G  13% /
tmpfs            64M     0   64M   0% /dev
tmpfs           3.9G     0  3.9G   0% /sys/fs/cgroup
shm              64M     0   64M   0% /dev/shm
/dev/sda1        98G   12G   82G  13% /webapp
tmpfs           3.9G     0  3.9G   0% /proc/acpi
tmpfs           3.9G     0  3.9G   0% /proc/scsi
tmpfs           3.9G     0  3.9G   0% /sys/firmware

jeff@hostos1:~$ sudo su -
[sudo] password for jeff:
root@hostos1:~# dd if=/dev/zero of=temphdd.img count=512 bs=1M
512+0 records in
512+0 records out
536870912 bytes (537 MB, 512 MiB) copied, 0.24546 s, 2.2 GB/s
root@hostos1:~# ls
snap  temphdd.img
root@hostos1:~# mkfs.ext4 temphdd.img
mke2fs 1.44.1 (24-Mar-2018)
Discarding device blocks: done
Creating filesystem with 131072 4k blocks and 32768 inodes
Filesystem UUID: 9930b7ef-ad1b-4476-900c-86217db591f6
Superblock backups stored on blocks:
        32768, 98304

Allocating group tables: done
Writing inode tables: done
Creating journal (4096 blocks): done
Writing superblocks and filesystem accounting information: done

root@hostos1:~# ls
snap  temphdd.img
root@hostos1:~# ls -al
total 356
drwx------  4 root root      4096  3월 25 15:32 .
drwxr-xr-x 24 root root      4096  3월 24 11:52 ..
-rw-------  1 root root       607  3월 25 10:36 .bash_history
-rw-r--r--  1 root root      3106  4월  9  2018 .bashrc
drwx------  2 root root      4096  8월  6  2019 .cache
-rw-r--r--  1 root root       148  8월 18  2015 .profile
drwxr-xr-x  5 root root      4096  3월 24 13:00 snap
-rw-r--r--  1 root root 536870912  3월 25 15:33 temphdd.img
root@hostos1:~# fdisk -l temphdd.img
Disk temphdd.img: 512 MiB, 536870912 bytes, 1048576 sectors
Units: sectors of 1 * 512 = 512 bytes
Sector size (logical/physical): 512 bytes / 512 bytes
I/O size (minimum/optimal): 512 bytes / 512 bytes
root@hostos1:~# mkdir -p /home/jeff/myvolume/
root@hostos1:~# mount -o loop temphdd.img /home/jeff/myvolume/

root@hostos1:~# docker run -v /home/jeff/myvolume/:/webapp -it --name=vquota ubuntu bash
Unable to find image 'ubuntu:latest' locally
latest: Pulling from library/ubuntu
5d3b2c2d21bb: Pull complete
3fc2062ea667: Pull complete
75adf526d75b: Pull complete
Digest: sha256:b4f9e18267eb98998f6130342baacaeb9553f136142d40959a1b46d6401f0f2b
Status: Downloaded newer image for ubuntu:latest
root@95f4df06debc:/# df -h
Filesystem      Size  Used Avail Use% Mounted on
overlay          98G   12G   82G  13% /
tmpfs            64M     0   64M   0% /dev
tmpfs           3.9G     0  3.9G   0% /sys/fs/cgroup
shm              64M     0   64M   0% /dev/shm
/dev/loop17     488M  780K  452M   1% /webapp
/dev/sda1        98G   12G   82G  13% /etc/hosts
tmpfs           3.9G     0  3.9G   0% /proc/acpi
tmpfs           3.9G     0  3.9G   0% /proc/scsi
tmpfs           3.9G     0  3.9G   0% /sys/firmware
- 도커 컨테이너 마운트
- 모든 용량을 /webapp에서 마운트가 됨
- 루트 권한 - dd명령어를 사용한 파일생성
- img파일 ext4 포맷
- img파일을 폴더마운트
- 도커 컨테이너 폴더마운트
docker volume 생성
# 데이터 전용 container 생성
jeff@hostos1:~$ docker create -v /data-volume --name=datavol ubuntu:14.04

# 데이터 전용 container를 볼륨으로 연결 -> --volume-from
jeff@hostos1:~$ docker run -it --volumes-from datavol:rw ubuntu:14.04
root@8dab8e527a64:/# echo 'testing data container' > /data-volume/test-volume.txt
root@8dab8e527a64:/# cat /data-volume/test-volume.txt
testing data container
root@8dab8e527a64:/# exit

jeff@hostos1:~$ docker run -it --volumes-from datavol ubuntu:14.04
root@f7ea20fbcaeb:/# cat /data-volume/test-volume.txt
testing data container
root@f7ea20fbcaeb:/# echo 'testing data container2' > /data-volume/test-volume2.txt
root@f7ea20fbcaeb:/# ls /data-volume/
test-volume.txt  test-volume2.txt
root@f7ea20fbcaeb:/# exit
container 파일 복사
# container 내의 파일을 host로 복사
docker container cp <container명 또는 ID>:<container 내의 파일 경로> <HOST 디렉토리 경로>
docker container cp <Host 파일> <container명 또는 ID>:<container 내의 경로>

#test container의 /etc/passwd 파일을 host의 /tmp/etc에 복사
jeff@hostos1:~$ docker run -itd --name=test_container centos
jeff@hostos1:~$ docker container cp test_container:/etc/passwd /home/jeff/centos_passwd.txt

#host의 현재 디렉터리에 있는 local.txt 파일으르 text container의 /tmp/local.txt로 복사
jeff@hostos1:~$ touch local.txt
jeff@hostos1:~$ docker container cp ./local.txt test_container:/tmp/local.txt
jeff@hostos1:~$ docker exec -t test_container ls /tmp
ks-script-esd4my7v  ks-script-eusq_sc5  local.txt

jeff@hostos1:~$ docker run -d -p 7777:80 --name=webserver nginx
f5391789e4bf4a2ecb5ae1f755ab036e26bae60591a0d4a8af083839db6ccfbe
jeff@hostos1:~$ docker cp webserver:/etc/nginx/nginx.conf /home/jeff/nginx.conf
jeff@hostos1:~$ docker cp nginx.conf webserver:/etc/nginx/nginx.conf
container 내에서 파일 변경 이력 확인
-container 안에서 어떤 조작을 하여 container가 image로부터 생성되었을 때와 달라진 점 (차분:diff)을 확인
- A: 추가된 파일
- B: 변경된 파일
- C: 삭제된 파일
jeff@hostos1:~$ docker run -it --name centos6_test centos:6 bash

[root@66a88f2c328b /]# mkdir docker_test
[root@66a88f2c328b /]# mkdir docker2_test
[root@66a88f2c328b /]# useradd docker_user


jeff@hostos1:~$ docker diff centos6_test
C /etc
C /etc/gshadow
C /etc/passwd-
C /etc/gshadow-
C /etc/group
C /etc/passwd
C /etc/shadow-
C /etc/group-
C /etc/shadow
C /home
A /home/docker_user
A /home/docker_user/.bash_logout
A /home/docker_user/.bash_profile
A /home/docker_user/.bashrc
A /docker2_test
A /docker_test
C /var
C /var/log
C /var/log/lastlog
C /var/spool
C /var/spool/mail
A /var/spool/mail/docker_user
container migration
# webserver container를 webserver.tar 파일로 저장
jeff@hostos1:~/LABs$ docker container run --name webserver -d -p 80:80 nginx
jeff@hostos1:~/LABs$ docker container export webserver > webserver.tar

# 생성된 tar 파일 상세 확인
jeff@hostos1:~/LABs$ tar -tvf webserver.tar
-rwxr-xr-x 0/0               0 2021-03-25 17:22 .dockerenv
drwxr-xr-x 0/0               0 2021-03-11 09:00 bin/
-rwxr-xr-x 0/0         1168776 2019-04-18 13:12 bin/bash
..

# 다른 서버로 전달
jeff@hostos1:~/LABs$ sudo scp webserver.tar jeff@hostos2:/home/jeff/webserver.tar

# 2번 서버에서 webserver.tar 파일을 기반으로 webap:1.0 image 생성
jeff@hostos2:~$ cat webserver.tar |docker import - webap:1.0

# 생성된 이미자 확인
jeff@hostos2:~$ docker images
REPOSITORY          TAG         IMAGE ID       CREATED          SIZE
webap               1.0         31c9c2918b17   4 seconds ago    131MB
1985ck/webfront     1.0         eb573e3b758f   43 minutes ago   133MB
'linux' 카테고리의 다른 글
| Docker 교육 2일차 정리 (310) | 2021.03.24 |
|---|---|
| Docker 교육 1일차 정리 (310) | 2021.03.23 |
| Ubuntu 20.04 + Nvidia 460.39 Hang issue (298) | 2021.03.16 |
| cuda 11.0 및 cudnn 설치 방법 - 리눅스(ubuntu18.04) (382) | 2021.02.17 |
| nvidia nvswitch install - 설치 과정 오류 해결 (415) | 2021.01.13 |


최근댓글